Allevi 2 Extruder Alignment Guide

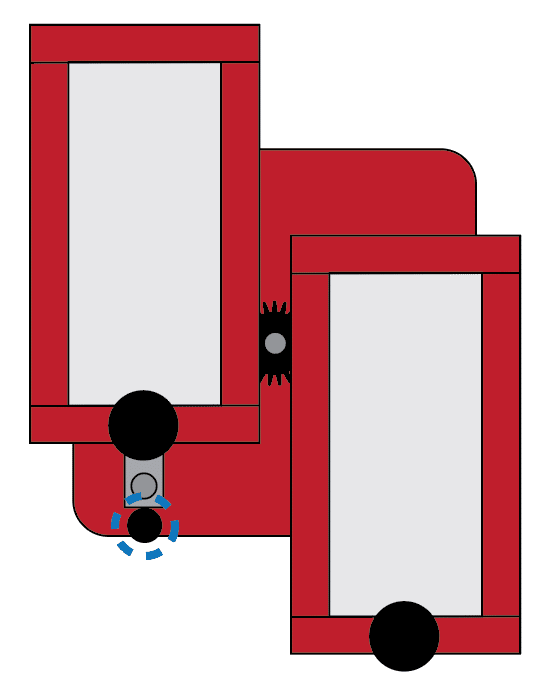
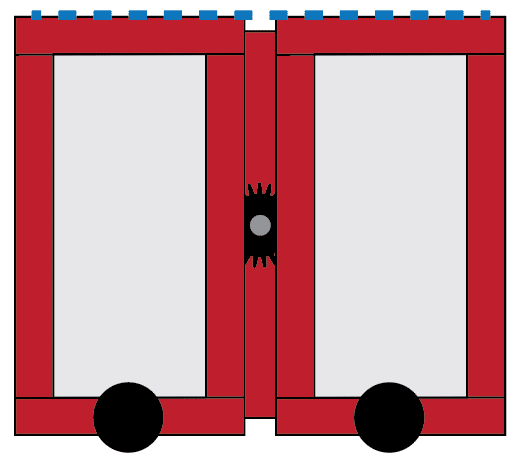
Through regular use, the rack and pinion connection between your Allevi 2’s extruders can become misaligned. This can result in clicking noises, extruders jumping, and inaccurate Z-coordinates. You can follow this extruder alignment guide to realign your Allevi 2 extruders and get back to work!
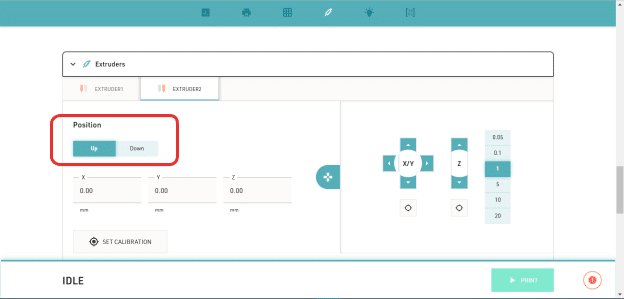
Extruder Alignment Instructions

Physical Re-Alignment

  1. Turn your Allevi 2 off using the power button on the front of the frame.
  2. Ensure that the extruders are moving freely by gently nudging the right extruder up and down by hand.
  3. Gently move the left extruder to its uppermost position.
  4. Remove the lower left bumper (see the blue dotted circle in the figure below) by unscrewing it with a counterclockwise motion. The small rubber piece should be fully removed and kept somewhere safe for later use.
    • The rubber bumper may be tight at first. Feel free to use blunt pliers to initially loosen the piece.
Extruder Alignment Guide allevi 2 bioprinter
  1. Gently slide the right extruder up until it hits the upper right bumper. Keep a hand on the left extruder as it moves down.
  2. When the right extruder reaches the top of its track, put a small amount of upward pressure on it. Simultaneously, gently slide the left extruder down. This will remove the left extruder.
  3. With the left extruder in hand, continue applying slight upward pressure on the right extruder to keep it at the top of its track.
  4. Begin sliding the left extruder back onto the left track. When you feel the left extruder re-engage with the gear in the middle of the carriage, begin gently lowering the right extruder as well.
    • If you have the gear and extruders aligned properly, the extruders should slide past each other smoothly, without making any clicking noise on the gear.
    • The extruders should also be level in the middle position (see the blue dotted line in the figure below).
Extruder Alignment Guide allevi 2 bioprinter
  1. When you have both extruders on their respective tracks, and they appear to be roughly level, gently raise the left extruder.
  2. Replace the rubber stopper under the left extruder.

Testing With User Interface

  1. Turn the printer back on.
  2. Watch the boot-up process to see if the extruder homing completes smoothly.
    • If homing results in any jumping or clicking, repeat the previous steps from the beginning.
    • If you have already repeated the above steps and are still having issues, contact the Allevi Support Team: [email protected].
  3. After boot-up, open the Bioprint Online Dashboard and navigate to the ‘Up’ and ‘Down’ buttons in the position settings of the “Extruder” section (see the red rectangle in the figure below).
  1. With Extruder 1 selected, use the ‘Down’ button to lower the left extruder into the printing position. Then, use the ‘Up’ button to return the left extruder to the middle position.
  2. If no jumping or clicking occurred, repeat the previous step with Extruder 2 selected.
  3. If no jumping or clicking occurred, go to the “Advanced” section of the dashboard.
  4. Open the gcode console and enter G28 E0 to rehome the extruders.
  5. If no jumping or clicking occurred, then the extruders should be properly aligned. Nice work!
  6. If jumping or clicking does occur during the software testing of either extruder, repeat the protocol from the first step.

You can also follow along our extruder alignment video below:

If after repeating the protocol you are still having issues with extruder alignment, contact the Allevi Support Team by emailing [email protected].

Ready to bioprint? Check out our protocols page to find helpful bioprinting guides.

Share this post

Need help with something else?

Ask us on chat →

Or get in Touch via email ↓