


After preparing for a biostudy, it’s time to mix them with the biomaterial of your choice and load your cell-laden bioink into the syringe.
Below we present a general guide for cell mixing and biomaterial loading, that can be modified according to the specific application.
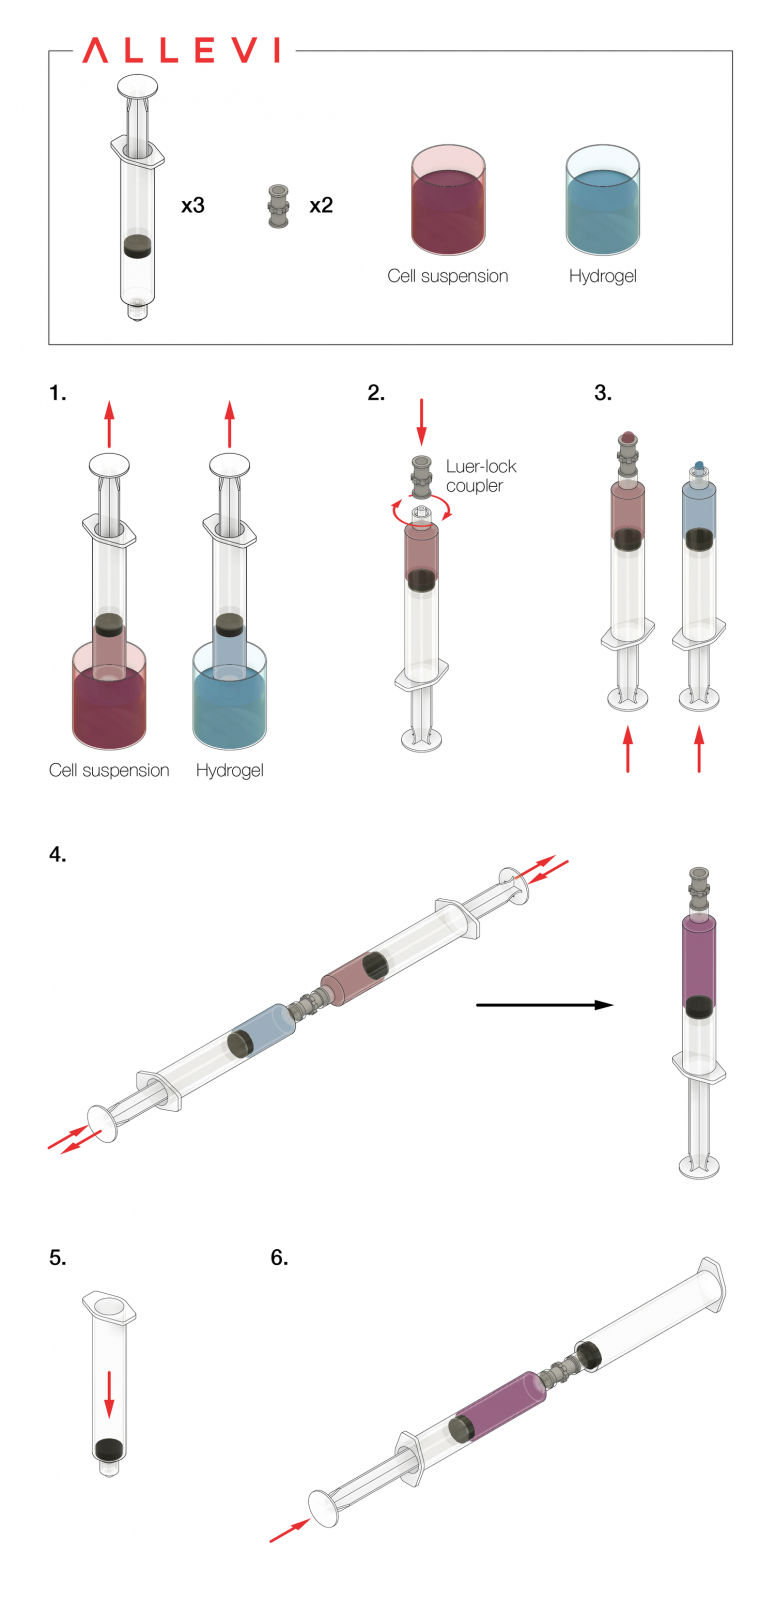
Cell mixing
- Calculate number of cells needed. This will vary depending on the cell type and your final application.
- Prepare a high-density cell suspension by centrifuging the desired number of cells and resuspending them in a small volume of cell culture media. Keep in mind that depending on the volume of the cell suspension and your biomaterial, you might affect the final concentration of the hydrogel. Include that factor in your calculations.
- If possible, pre-warm your sterile biomaterial to 37 °C to avoid additional temperature stress for the cells. Keep in mind that some materials should be kept at low temperatures to ensure good printability (e.g. collagen).
- Aspirate the cell suspension to a syringe with Luer-lock tip. Since you will be working with a small volume of high-density cell suspension, we recommend using 1-3 ml syringe.
- Load your biomaterial to a syringe with Luer-lock tip by aspirating it from its container.
- Attach a sterile Luer-lock coupler on the end of the syringe with the cell suspension.
- With your cell media syringe, slowly push the plunger in until the media forms a slight external meniscus above the end of the coupler on the syringe.
- With your biomaterial syringe, slowly push the plunger in until the hydrogel forms a slight external meniscus above the end of the syringe.
- Couple the syringe with cells to the syringe with the biomaterial. Ensure that there are no air bubbles in the system.
- Slowly push plungers back and forth ~40 times to ensure thorough mixing. End with all of the now cell-laden material in the biomaterial syringe.
- Prepare a syringe for bioprinting:
- Attach the syringe with cell/biomaterial mix to the printing syringe using Luer-lock coupler.
- Slowly push all the material to the printing syringe.
- Attach the air compressor line to the syringe and place the syringe into the extruder head. Make sure you lock it in the place to avoid movement during the printing.
Notes
- While calculating the necessary volume of your biomaterial, take into account dead-volume in the Luer-lock coupler and needle tips, that might affect the amount of material available for bioprinting.
- If your material has low viscosity and is easy to pipette, you can alternatively combine cell suspension and biomaterial in a tube and aspirate that mixture to a syringe. After that go to step 11.
You are ready to go! If you have any questions about the protocol above, please contact us at [email protected].


