


Overview
Passaging is required when cells have proliferated to confluences around 80%. This important step enables you to culture enough cells for your experiments, as well as maintain the health of your cell lines. This protocol will walk you through the process of passaging cells, as well as keeping track of passage numbers to ensure that you are using passages that still represent good cell line functionality. Please note that some cell lines cannot be passaged.
Materials
- Cell Culture Flasks
- Cell Culture Media
- Sterile tissue culture flasks or culture dishes of choice
- ReagentPack™ Subculture Reagents
- Trypsin/EDTA
- Trypsin Neutralizing Solution (TNS)
- HEPES Buffered Saline Solution (HBSS)
- Centrifuge Tubes
- Centrifuge
- Micropipettes
- Micropipette Tips
- Microscope
- Incubator (37˚C, 5% CO2, 90% humidity)
- Timer
- 70% Ethanol
- Kimwipes
- Vacuum Bottle
Methods
- Warm cell culture medium and ReagentPack™ reagents to 37˚C in the water/bead bath;
- Spray them down with ethanol and place them inside a biosafety cabinet (BSC);
- Spray down incubator doors with ethanol and minimize breathing to diminish contamination risk;
- Remove cell culture flasks from incubator and place them under microscope. See here for more information on bacterial contamination and how to identify it;
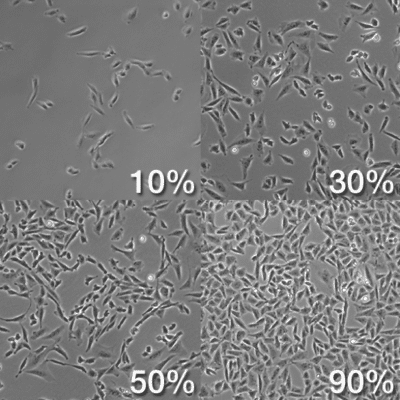
- Still under the microscope, check for flask confluency by analyzing the ratio of surface area occupied by cells and surface area not occupied by cells. It is good practice to passage cells that are ~80% confluent to ensure a high yield;
Source: https://biology.stackexchange.com/questions/29857/origin-of-term-confluency-in-cell-culture - Spray down flasks with ethanol. Avoid spraying the filter cap. Wipe the flask with Kimwipes and place them in BSC;
- Aspirate cell media from culture flasks, ensuring to avoid touching the bottom of the flask;
- Wash flask with HBSS, using the amount needed to cover your cell culture flask surface;
- Aspirate HBSS;
- Add trypsin/EDTA to the flask, using the amount needed to cover your cell culture flask surface (write down this volume);
- Note: the recommended volume/flask surface area is 0.5 mL/10 cm2.
- Gently rock your flask and place it back into the incubator for 5 minutes;
- Check cells under the microscope to see if they have released from the bottom of the flask (are floating). If so, go to the next step. If not, spray the flask down with ethanol, wipe it with Kimwipes and place it into the incubator for another 5 minutes. Repeat this step until cells are released, ensuring to not exceed 15 minutes of trypsin/EDTA exposure, as it may be toxic to cells;
- Add the same volume of TNS to your flask as trypsin/EDTA in order to neutralize trypsin/EDTA activity;
- Pipette cell suspension into a centrifuge tube;
- Centrifuge for the time and speed indicated for you cell type;
- Note: usually, centrifugation time is 5-10 minutes, and speed is 100-200 X g.
- Note: to convert from g to rpm, use the following formula: g = 1.12 x rotor radius (in mm) x (rpm/1000)2
- Spray down your centrifuge tube with ethanol and wipe it with Kimwipes before going back into the BSC;
- After centrifuging, you should be able to see a cell pellet at the bottom of the flask. Gently aspirate supernatant, ensuring to not disturb the pellet;
- Count your cells following this protocol;
- Find the number of flasks or dishes you will need to replate your cells by using the following formula;
- Number of flasks (nflasks) = Total number of cells/cell seeding density/Flask surface area (a)
- Note: optimal cell seeding varies depending on cell type. However, it is common to seed cells at a density of 2,000-5,000 cells/cm2.
- You will need to add 1 mL of cell suspension to each flask, so add the remaining amount of media to your cell suspension tube (since you resuspended it in 1-5 mL for counting) to have a total volume of nflasks;
- Example: If you resuspended your cells in 1 mL and you are replating them in 5 flasks, add 4 mL to complete the suspension volume necessary to be able to add 1 mL of cell suspension per flask.
- Add 1 mL of cell suspension to each flask;
- Note: if you had a high yield of cells and want to replate them in fewer flasks than in the calculation above, use the remaining cell suspension and follow this protocol on how to freeze your remaining cells.
- Find the amount of cell media you will need to culture your cells by using the formula below;
- Volume of culture media = 0.2 mL * flask surface area in cm2.
- Add the volume of media you found on the previous step to each flask;
- Label your flasks. It is good practice to include the following information;
- Your initials and date of passage (e.g.: if your initials are YN, and the date is MM/DD/YYYY, label it as YNYYYMMDD)
- Cell line and passage number (if your flasks were Pn, they will now be Pn+1).
- Note: some cell types do not maintain optimal function after P5 (passage 5). Other cell types, such as cancer cells, can be passaged up to 20 times. Follow manufacturer guidelines to check optimal passage numbers for each cell type to ensure best experiment results.
- Place your cells in the incubator;
- Follow this protocol for instructions on how to change cell media, at the frequency indicated for your cell type;
- Once your flasks have reached ~80% confluency, follow this protocol for instructions on how to passage your cells.


